반응형
커멘드 패턴 이해를 위한 간단한 문제 제안
- 필자는 고객의 요구사항에 의해서 만능 IOT 리모컨을 만들려고 합니다.
- 리모컨에는 아래와 같은 방식으로 만들려고 해요!
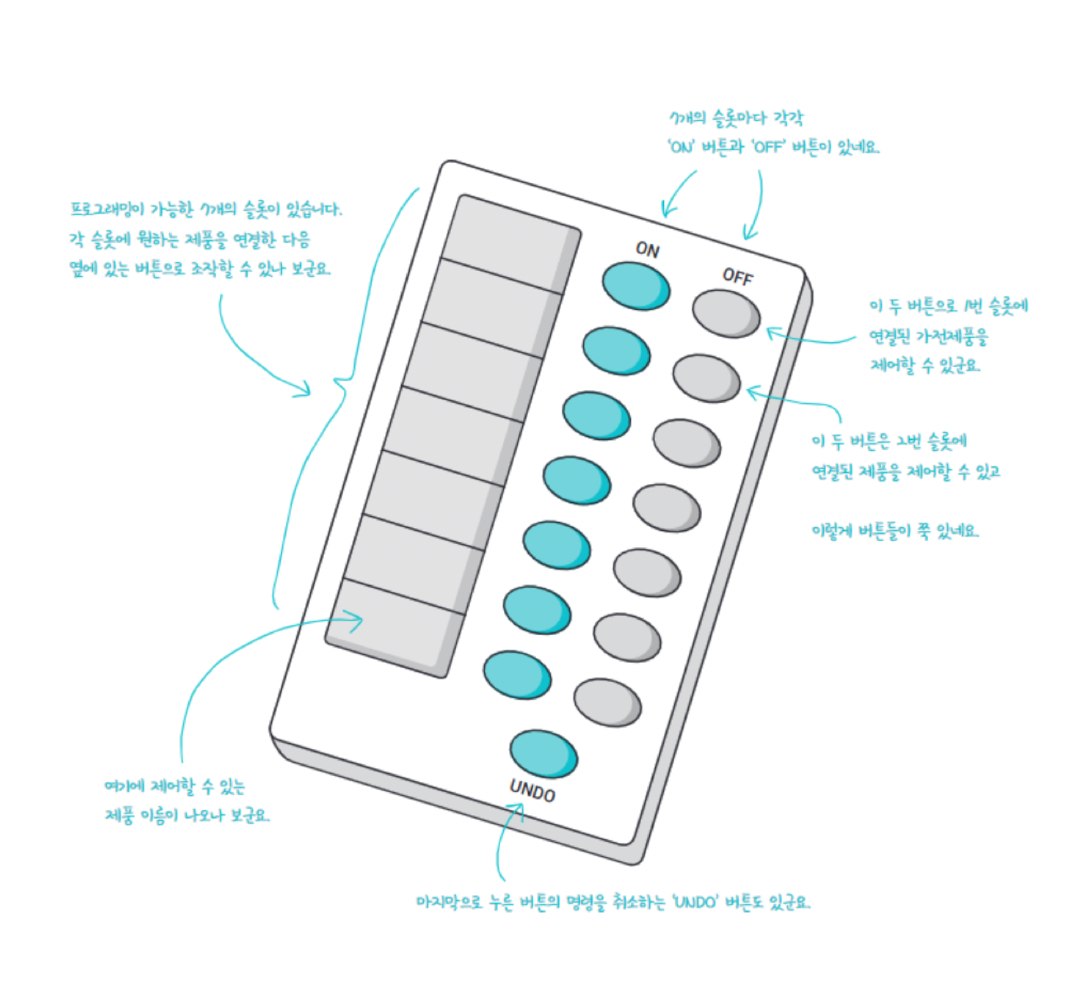
- 그림을 보면 7개의 기능들이 각 슬롯마다 매핑되어야 하는것을 알 수 있습니다.

- 문제는 각 기능들의 공통된 인터페이스가 없다라는 상황입니다.
- 예를 들어 ON의 첫 번째 버튼은 TV의 관련 기능이고 두 번째는 선풍기 전원이라고 가정하겠습니다.
- TV의 기능 ON에는 TV가 켜진순간 볼륨도 켜져야하고 채널의 최초 번호수도 결정되어야 합니다.
- 선풍기는 ON 되는 순간 방향의 세기가 결정되어야 합니다.
- 이처럼 공통 인터페이스가 없는 경우 위의 사진처럼 여러 클래스가 난잡해지는 문제가 발생합니다.
- 하물며 고객은 나중에 다른 제품이 추가될 수 있게 확장성 있는 개발을 원합니다.
- 이런 경우 문제를 해결하기 위해 등잔한 디자인 패턴이 커멘트 패턴입니다.
커맨드 패턴이란
- 리모컨처럼 작업을 요청하는 요청자와 작업을 수행하는 대상을 분리하는것이 커맨트 패턴의 핵심 개념입니다.
- 커맨드 패턴을 이해하기 쉽게 식당에서 주문을 하는 예시를 들어 커멘드 패턴을 소개해보겠습니다.
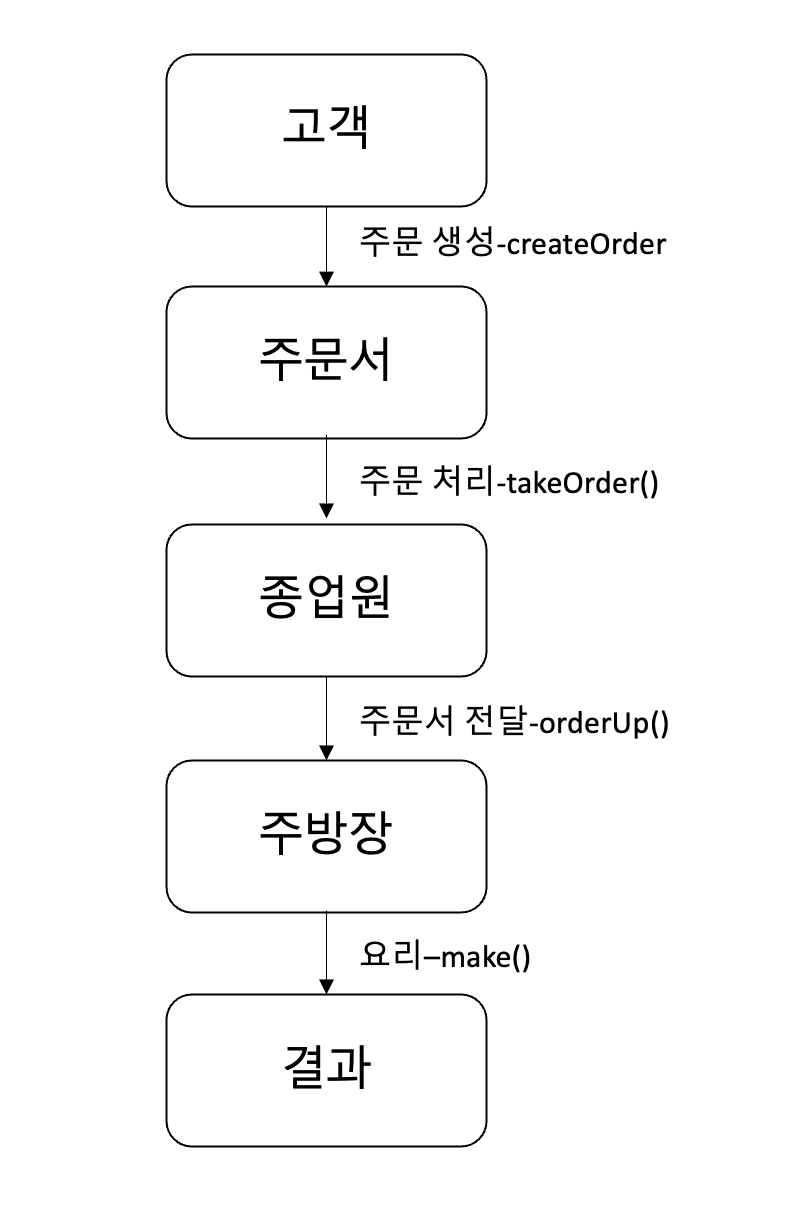
- 먼저 고객이 주문을 시도합니다. 이때 주문(createOrder)이라는 행동이 수행되고 주문(Order)이 생성됩니다.
- 이후 주문 처리(takeOrder())가 수행되고 종업원은 주문을 주방장에게 전달(OrderUp)하게 됩니다.
- 주문서를 전달받은 주방장은 요리를 수행하게 되고(make()) 음식이라는 결과물이 나오게 됩니다.
식당 주문 절차를 객체와 메소드를 통해 연관 지어보기
- 주문서는 종업원에게 전달해주는 방식으로 주문 내용을 캡슐화하고 있습니다. 주문서 객체에는 식사 준비하기 위한 행동인 orderUp() 메소드가 캡슐화 되어 있습니다. 또한 식사를 주문해야 하는 객체(주방장)의 참조도 들어있습니다.
- 종업원은 주문서의 어떠한 정보도 모르며 어떤 주방장이 요리할지에 대한 정보도 모릅니다. 주방장에게 주문서 정보를 던져주기만 하면 되죠. 코드적인 측면으로는 캡슐화가 되었다는것을 의미합니다.
- 종업원은 주문서를 받고 orderUp() 메소드를 호출합니다.
- orderUp()메소드를 호출해서 주방장을 호출하기만 하면 됩니다.
- 종업원의 takeOrder() 메소드에는 여러 고객의 주문서를 매개변수로 전달합니다.
- 위의 절차대로 주방장은 식사를 준비하는데 필요한 정보를 가지고 있습니다.
- 위의 절차대로 각 객체(고객,주문서,종업원,주방장)들은 서로에 대한 정보를 몰라도 됩니다.
- 즉 커맨드 패턴은 어떤 것을 요구하는 객체와 그 요구를 받아 처리하는 객체를 분리한 디자인 패턴의 모델인것을 알 수 있습니다.
커맨드 패턴으로 살펴보는 다이어그램
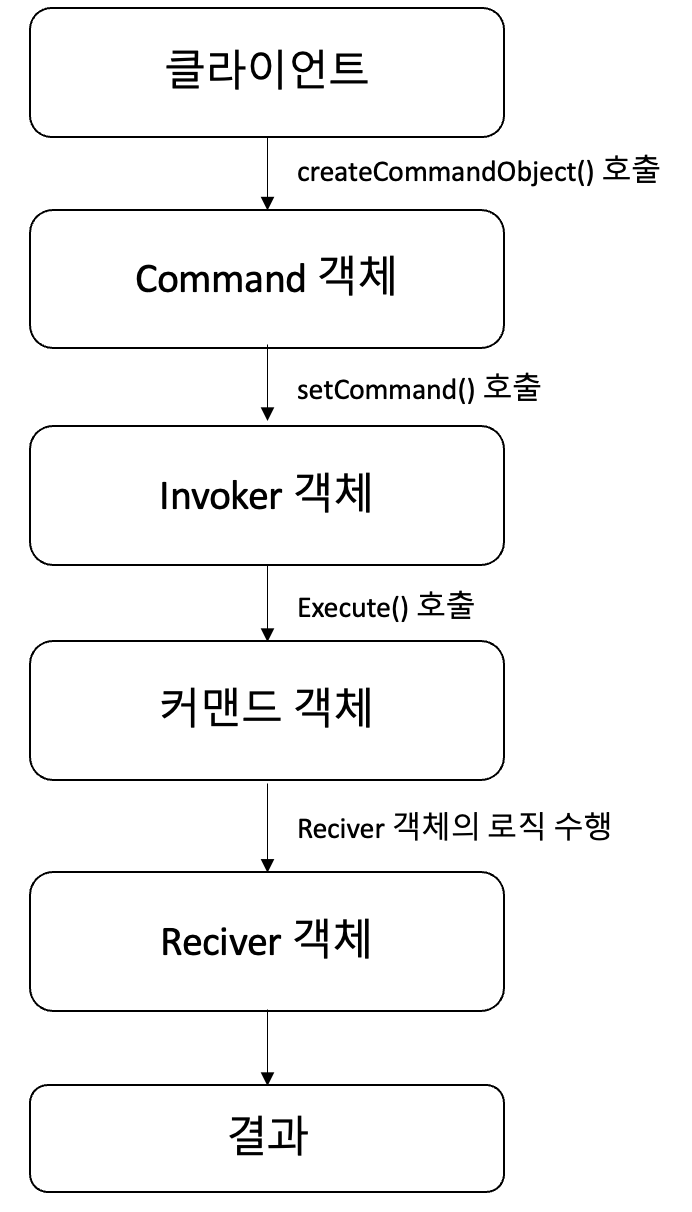
- 식당에서 주문을 하는 절차들을 커맨드 패턴으로 변화한 것입니다. 위의 정보들은 아래처럼 바뀌게 됩니다.
- 고객 → 클라이언트 객체
- 주문서 → 커멘드 객체
- takeOrder() → setCommand()
- 종업원 → 인보커 객체
- orderUp() → execute()
- 주방장 → 리시버 객체
- 먼저 클라이언트가 커멘드 객체를 생성합니다.
- 개발자가 커멘드 객체를 생성한다고 생각하면 됩니다.
- 이후 커멘드 객체에 의존하고 있는 인보커 객체의 setCommand를 호출하여 커멘드 객체를 저장합니다,
- 마지막으로 커멘드 객체에 의존하고 있는 인보커 객체를 커멘드 객체의 execute()를 통해 수행합니다.
커멘드 패턴 구현하기
- 위의 개념을 학습하여 커맨드 패턴을 활용하여 리모컨의 조명 통제 기능을 추가해보도록 하겠습니다.
커멘드 인터페이스 구현
public interface Command {
	public void execute();
}- 커멘드 객체는 모두 같은 인터페이스를 구현해야하기 커멘트 객체는 때문에 위의 interface를 정의하여 사용해야 합니다.
- 식당 다이어그램에서는 orderUp()이라는 예제를 사용했지만 범용적으로 execute()라는 이름을 많이 사용합니다.
커멘드 클래스 구현
public class LightOnCommand implements Command {

    Light light;

    public LightOnCommand(Light light) {
        this.light = light;
    }

    public void execute() {
        light.on();
    }
}- 조명을 켜는 명령을 내리는 LightOnCommand입니다.
- 생성자에 커멘드 객체를 통해 수행될 대상 객체를 전달해줍니다.
- 이후 execute() 메소드를 통해 수행됩니다.
커멘드 객체 사용하기
//
// This is the invoker
//
public class SimpleRemoteControl {
	Command slot;

	public SimpleRemoteControl() {}

	public void setCommand(Command command) {
		slot = command;
	}

	public void buttonWasPressed() {
		slot.execute();
	}
}- 예제를 간단히 진행하기 위해 리모컨 버튼이 하나만 있다고 가정하겠습니다.
- setCommand()를 통해 Command를 결합합니다.
- 리모컨 버튼의 기능을 바꾸고 싶다면 해당 메소드만 변경하면 얼마든지 유동적으로 변경이 가능합니다.
- buttionWasPressed()를 사용해 execute 메소드가 호출됩니다.
커멘드 객체 테스트하기
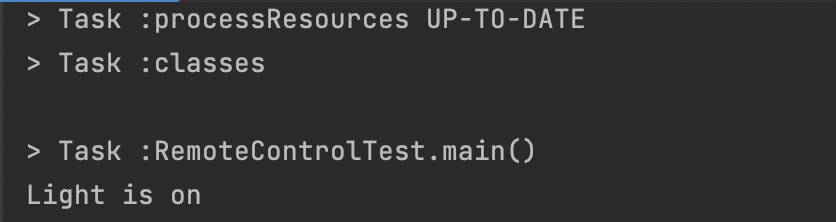
public class RemoteControlTest {
	public static void main(String[] args) { //클라이언트
		SimpleRemoteControl remote = new SimpleRemoteControl(); // Invoker 객체 생성
		Light light = new Light(); //Command 객체의 실행 로직을 가지고 있는 객체 생성
		LightOnCommand lightOn = new LightOnCommand(light); //Command 객체 생성

		remote.setCommand(lightOn);
		remote.buttonWasPressed();
    }

}
실행결과
기능이 여러개인 리모컨 만들기
@FunctionalInterface
public interface Command {
	public void execute();
}- 위와 마찬가지로 커멘드 객체의 의 기능을 공통화하기 위한 인터페이스입니다.
public class CeilingFan {
	String location = "";
	int level;
	public static final int HIGH = 2;
	public static final int MEDIUM = 1;
	public static final int LOW = 0;

	public CeilingFan(String location) {
		this.location = location;
	}

	public void high() {
		// turns the ceiling fan on to high
		level = HIGH;
		System.out.println(location + " ceiling fan is on high");

	}

	public void medium() {
		// turns the ceiling fan on to medium
		level = MEDIUM;
		System.out.println(location + " ceiling fan is on medium");
	}

	public void low() {
		// turns the ceiling fan on to low
		level = LOW;
		System.out.println(location + " ceiling fan is on low");
	}

	public void off() {
		// turns the ceiling fan off
		level = 0;
		System.out.println(location + " ceiling fan is off");
	}

	public int getSpeed() {
		return level;
	}
}
public class Light {
String location = "";
public Light(String location) {
this.location = location;
}
public void on() {
System.out.println(location + " light is on");
}
public void off() {
System.out.println(location + " light is off");
}
}public class GarageDoor {
String location;
public GarageDoor(String location) {
this.location = location;
}
public void up() {
System.out.println(location + " garage Door is Up");
}
public void down() {
System.out.println(location + " garage Door is Down");
}
public void stop() {
System.out.println(location + " garage Door is Stopped");
}
public void lightOn() {
System.out.println(location + " garage light is on");
}
public void lightOff() {
System.out.println(location + " garage light is off");
}
}public class Stereo {
String location;
public Stereo(String location) {
this.location = location;
}
public void on() {
System.out.println(location + " stereo is on");
}
public void off() {
System.out.println(location + " stereo is off");
}
public void setCD() {
System.out.println(location + " stereo is set for CD input");
}
public void setDVD() {
System.out.println(location + " stereo is set for DVD input");
}
public void setRadio() {
System.out.println(location + " stereo is set for Radio");
}
public void setVolume(int volume) {
// code to set the volume
// valid range: 1-11 (after all 11 is better than 10, right?)
System.out.println(location + " stereo volume set to " + volume);
}
}- CeilingFan, Light, GarageDoor, Stereo 모두 Invoker를 통해 수행될 대상이 되는 객체들입니다.
//
// This is the invoker
//
public class RemoteControl {
	Command[] onCommands;
	Command[] offCommands;

	public RemoteControl() {
		onCommands = new Command[7];
		offCommands = new Command[7];

		for (int i = 0; i < 7; i++) {
			onCommands[i] = () -> { }; //NoCommand 객체를 람다식으로 대체
			offCommands[i] = () -> { };
		}
	}

	public void setCommand(int slot, Command onCommand, Command offCommand) {
		onCommands[slot] = onCommand;
		offCommands[slot] = offCommand;
	}

	public void onButtonWasPushed(int slot) {
		onCommands[slot].execute();
	}

	public void offButtonWasPushed(int slot) {
		offCommands[slot].execute();
	}

	public String toString() {
		StringBuffer stringBuff = new StringBuffer();
		stringBuff.append("\n------ Remote Control -------\n");
		for (int i = 0; i < onCommands.length; i++) {
			stringBuff.append("[slot " + i + "] " + onCommands[i].getClass().getName()
				+ "    " + offCommands[i].getClass().getName() + "\n");
		}
		return stringBuff.toString();
	}

}- Invoker 객체입니다.
- 특이한 점은 NoCommand 객체를 람다식으로 대체했다는것입니다.
- NoCommand 객체는 일종의 NULL 객체입니다. 예시 기준으로 리모컨에 사용되지 않는 버튼에 NoCommand 객체를 정의해서 execute 메소드를 호출해도 문제가 되지 않도록 설정한 것입니다.
- NoCommand 객체는 여러 대자인 패턴에서 유용하게 사용됩니다.
public class RemoteLoader {

	public static void main(String[] args) {
		RemoteControl remoteControl = new RemoteControl();

		Light livingRoomLight = new Light("Living Room");
		Light kitchenLight = new Light("Kitchen");
		CeilingFan ceilingFan= new CeilingFan("Living Room");
		GarageDoor garageDoor = new GarageDoor("Main house");
		Stereo stereo = new Stereo("Living Room");

		remoteControl.setCommand(0, livingRoomLight::on, livingRoomLight::off);
		remoteControl.setCommand(1, kitchenLight::on, kitchenLight::off);
		remoteControl.setCommand(2, ceilingFan::high, ceilingFan::off);

		Command stereoOnWithCD = () -> {
			stereo.on(); stereo.setCD(); stereo.setVolume(11);
		};
		remoteControl.setCommand(3, stereoOnWithCD, stereo::off);
		remoteControl.setCommand(4, garageDoor::up, garageDoor::down);

		System.out.println(remoteControl);

		remoteControl.onButtonWasPushed(0);
		remoteControl.offButtonWasPushed(0);
		remoteControl.onButtonWasPushed(1);
		remoteControl.offButtonWasPushed(1);
		remoteControl.onButtonWasPushed(2);
		remoteControl.offButtonWasPushed(2);
		remoteControl.onButtonWasPushed(3);
		remoteControl.offButtonWasPushed(3);
		remoteControl.onButtonWasPushed(4);
		remoteControl.offButtonWasPushed(4);
		remoteControl.onButtonWasPushed(5);
	}
}- RemoteLoader에서의 테스트는 일반 테스트와 다를거 없지만 다른점이 있다면 setCommand에서 람다 형식으로 전달하기 때문에 커멘드 객체가 사라졌다는것입니다.
- 사실상 람다식을 사용하면 커멘드 객체의 대상이 되는 객체가 커멘드 객체의 역할을 수행하게 됩니다.
- ex:) Light, Stereo
- 이러한 방법은 Command 인터페이스에 추상 메소드가 하나뿐일 때만 사용할 수 있습니다.
- 이외에도 매크로를 설정하여 각 기능들을 한 번에 동작하기, undo(이전으로 되돌리기) 등 추가적이 구현이 가능합니다.
정리
- 커맨트 패턴을 사용하면 요청하는 객체와 요청을 수행하는 객체를 분리할 수 있습니다.
- 분리하는 과정에서 커멘드 객체가 있으며 커멘드 객체를 수행하는 Invoker가 존재합니다. Command 개체가 수행하는 행동을 캡슐화한것이 리시버입니다.
- 여러개의 커멘드를 실행하는 매크로 커멘드를 구현할 수 도 있고 이전 작업으로 되돌리는 작업 되돌리기 기능을 만들수도 있다.
- 커맨드 패턴은 요청 내역을 객체로 캡슐화해서 객체를 서로 다른 요청 내역에 따라 매개변수화 할 수 있습니다.
- 이러한 요청을 큐에 저장하거나 로그로 기록하는 용도로 사용할 수 있습니다.
- 이러한 기록들은 서버에 장애가 발생하였을 때 최근 작업을 다시 시작할 수 있는 방향으로 사용할 수 도 있습니다.
ps. 266페이지의 핵심정리에서 “커멘드는 인보커를 매개변수” → “인보커는 커멘드를 매개변수”가 맞지 않나?
반응형
'디자인 패턴' 카테고리의 다른 글
| CHAPTER 08.템플릿 메소드 패턴 (0) | 2023.05.06 |
|---|---|
| CHAPTER 07.어댑터 패턴과 퍼사드 패턴 (2) | 2023.05.06 |
| CHAPTER 05.싱글톤 패턴 (0) | 2023.05.06 |
| CHAPTER 04.팩토리 패턴 (0) | 2023.05.06 |
| CHAPTER 03.데코레이터 패턴 (0) | 2023.01.22 |